
wendyd24
Sorry to hear of your difficulty with this file. It is indeed strange/rare. However, I have seen this once or twice before. It was due to some corrupt components or deeply nested components in the file. I have also seen it caused by the model being too far from the origin/world axis/(0,0,0).
PLEASE READ THE "
PRE-FLIGHT CHECKLIST" which is number one of our
TUTORIALS for any beginner to read when starting with any rendering software, especially with Twilight Render. Also - please see our Video Tutorials - especially our latest video series "6 essentials to rendering with Twilight". The link is in my signature below.
We have taken a look at your model.
- The first major problem is that your window components are not cutting a hole in the wall. You need to cut a hole/delete the face wherever you want the glass to work as glass.
- The next thing is that your walls and ceiling should have thickness.
- Next, the whole model appears to be about 2x larger than it should be in real life. Rule 1 in modeling for rendering is to build everything in 1:1 scale - Build things the size they are in real life. That said, as we don't know your project, it is possible we are incorrect in this assessment.
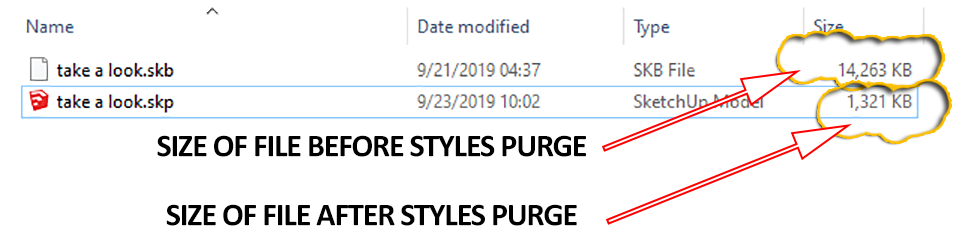
Side note/tip: It appears at first glance you have approximately 100 types of SketchUp view "styles" loaded. We purged the unused styles and enabled "3DPrinting" style for easy of viewing, and most efficient view navigation.
It is suggested that you tell SketchUp to stop saving a new style over-and-over. This is an odd and annoying behavior given to SketchUp a few generations back and we are still baffled by this behavior of the software.
Purging unused styles resulted in file size reduction of 13Mb.


- PURGE-STYLES.png (57.92 KiB) Viewed 4065 times
Also, as it appears you may be new to using SketchUp, there are ways you can speed up SketchUp's performance to streamline your workflow.
Fletch wrote: ↑Sat Apr 03, 2010 9:57 am
Did you know you can set a default sky for Twilight so that each new scene you make uses your favorite settings automatically?
Simply set up any new scene however you want to be your default, and choose "File>Save As Template" give it a name.
You can even create one in Centimeters, and one in Inches (if you work in both) and load them at any time from:
"Window>System Preferences>Template"
If you want the fast and easy way... simply:
- Open up one of the attached files with good recommended quick-rendering defaults for Twilight,
- Set your location on earth under "Pull-down Menu>Window>Location" (if you don't live in Colorado, USA)
- then choose "File>Save As Template" and give it a name.
- This will now be your default Template in SketchUp.
Here is a step-by-step for setting up this new template for yourself including some things you may not have thought of... some of them will speed up the performance of SketchUp on your machine if you have a mid-level or lower-level graphics card.
- In SketchUp choose "File>New"
- In SketchUp use Ctrl+A, then Delete key to Delete everything in the New scene (for instance, the default "Sang" face-me guy component if he is there... do really you still need him? No offense to Sang of course!
 )
)
- In SketchUp open the "Model Info" Dialog in the "Window" pulldown menu item.
- Statistics>Purge Unused (gets rid of extra materials and components left over from deleting the model of Sang)
- Animation> Set Transition time to however you like,
- Animation> Set Scene Delay to Zero (so that if you render animations, it will not render the same scene over and over for the length of the scene delay... add delays in your video editor in post-pro)
- Location> Set your preferred Location on Earth
- Units> Set your units for your favorite (architectural inches? centimeters?)
- In SketchUp Window Pull-down menu choose "Shadow Settings":
- UNCHECK "On Ground" (gets rid of pesky shadow falling on nothing in the SketchUp view, and reminds you that there's no such thing as an invisible ground plane when you render with Twilight)
- if you do mostly interiors... TURN OFF "Display Shadows" and CHOOSE "Use Sun for Shading" , then set the Shadow Light and Dark to something like 80 and 80 (brightens up view in SU for interiors
 )
)
- if you do mostly exteriors... set the Shadow Light and Dark to something you prefer, and if you are one who prefers to work quickly, TURN OFF "Display Shadows".
- Set Date and Time to something you like as default
- Pull-down menu: Window>Scenes ... check or uncheck boxes as you wish for SU to remember for your new scenes
(do you really want it to remember the axes location and style and fog settings?)
- Pull-down menu: Window>Styles:Edit Tab> UNCHECK "Extensions" and UNCHECK "Profiles"
(improves speed of SketchUp view, for modeling and just looks better than the annoying fake sketchy look.  )
)
- Pull-down menu: Window>Fog set to OFF
(if this was on, which is not likely... but we thought we should mention it)
- NOW FOR THE COOL PART...

- Open Twilight Light Settings Dialog:
- Make sure the sky type is the default "Physical Sky" Set your Sun (radius) Slider to 7 or 10.
- Set sun color if you wish like this... (NOTE:this will significantly reduce the blue cast that comes with the default Twilight Physical Sky, and give a more refined white brightness)
- rgb(230, 214, 209)
- Maximum Sun Intensity: 4.00
-
 Now Save this Scene Setup as your Default SketchUp Template by going to File>Save As Template... give it a name, and description if you like.
-
 Now, you can create different templates with various sky settings... perhaps try one of these suggestions:
- Evening Sky? Try a Late October Sky (assuming Boulder Colorado location) at 4:45pm, then DISABLE THE SUN in the Twilight Sun/Sky Dialog. Leave Physical Sky on.
- Mars? Using some experimentation, Set sun shadows to perhaps 3, sun brightness to at least 5, and sun color to quite a warm red. Use a small test scene and re-render on Low+ to check the settings as you work.
- Product Shots? Disable the sun and set sky to "Spherical" and load your favorite Light Tent .hdr, setting Sky Intensity to what renders best for your typical product. This may be as low as .1 Sky Intensity!
- Product Shot Alternative Setting? Set sky to light grey and disable the sun.
- Product Shot Alternative Setting2? Insert the Twilight Component with the Product Studio Lighting and disable the sun, set sky to Background, black color
- When ready for a new scene, choose any template you wish before you start modeling from "Window>System Preferences>Template" (if you already have a model, but wish to load a different sky, you will have to open a second instance of SketchUp, set your template, then copy the model you are in, and paste-in-place into the new model template. There is this script called PageExIm.rb available that will allow you to export your scenes from one model, and import them into the new model.
Before saving your new SketchUp Template, insert some small rectangular faces with your favorite materials that you may have created from the Twilight Material Templates... this way they are already in your default scene when you load it.