Page 1 of 2
Master Bedroom
Posted: Mon Sep 14, 2020 2:42 am
by recneps0610
It's been a long time since I last post. Hope everyone is fine. Did a recent interior proposal of a bedroom, and thought of sharing. Do let me know what you think.

Re: Master Bedroom
Posted: Mon Sep 14, 2020 8:55 am
by Mike1158
Very sharp, lots to like.

Re: Master Bedroom
Posted: Mon Sep 14, 2020 11:42 am
by recneps0610
Thanks Mike
Re: Master Bedroom
Posted: Mon Sep 14, 2020 9:05 pm
by Fletch
recneps0610, very good!
Re: Master Bedroom
Posted: Mon Sep 14, 2020 10:02 pm
by tuna57
Definitely has “today’s look”

Re: Master Bedroom
Posted: Tue Sep 15, 2020 6:35 am
by recneps0610
Fletch wrote: ↑Mon Sep 14, 2020 9:05 pm
recneps0610, very good!
Thanks Fletch

Re: Master Bedroom
Posted: Tue Sep 15, 2020 6:35 am
by recneps0610
tuna57 wrote: ↑Mon Sep 14, 2020 10:02 pm
Definitely has “today’s look”
Thanks Tuna
Re: Master Bedroom
Posted: Wed Sep 16, 2020 6:25 am
by Fletch
This is my most important tip lately, as it's surprisingly important and simple to do:
In the SketchUp material editor use the HLS type color editor, and slide that "L" - "lightness" slider down
the same amount for all your textures - slide it down approximately 30% so that
uniformly you make all your materials relatively darker. Most importantly all of your lighter materials (like the texture in your scene containing white, but also some other colors) but not only that - be sure to set all white surfaces like ceiling and walls in your scene to 70% grey.
Why?
This is closer to real-world physics and proper gamma space for your textures/colors/materials.
This means that the calculations for the light bounces will be more accurate, and so the error check that is built into the rendering algorithm will reject less of it's calculations and have to correct less, which means it will find a good result more quickly.
Be sure your light powers are set to real-world realistic values, if you find yourself increasing light powers more and more, then it could be that something is wrong. Instead, you should use the Post-Process tab in the Render Dialog (little button at bottom of dialog box) to adjust the brightness of the rendering. Try adjust the Light and Dark values found on the Linear tab inside of the Post-Process Dialog - it can give better results in many cases - especially with interior renderings when interior lights are shining directly on nearby light-colored surfaces.
After you feel you have gotten this set up right, you can then individually boost/decrease the relative "lightness" of each texture. You should be comparing the lightness of the rendered wood and the rendered white walls and other adjacent materials. It is a balance between the artist's eye and actual physics of light in this phase.
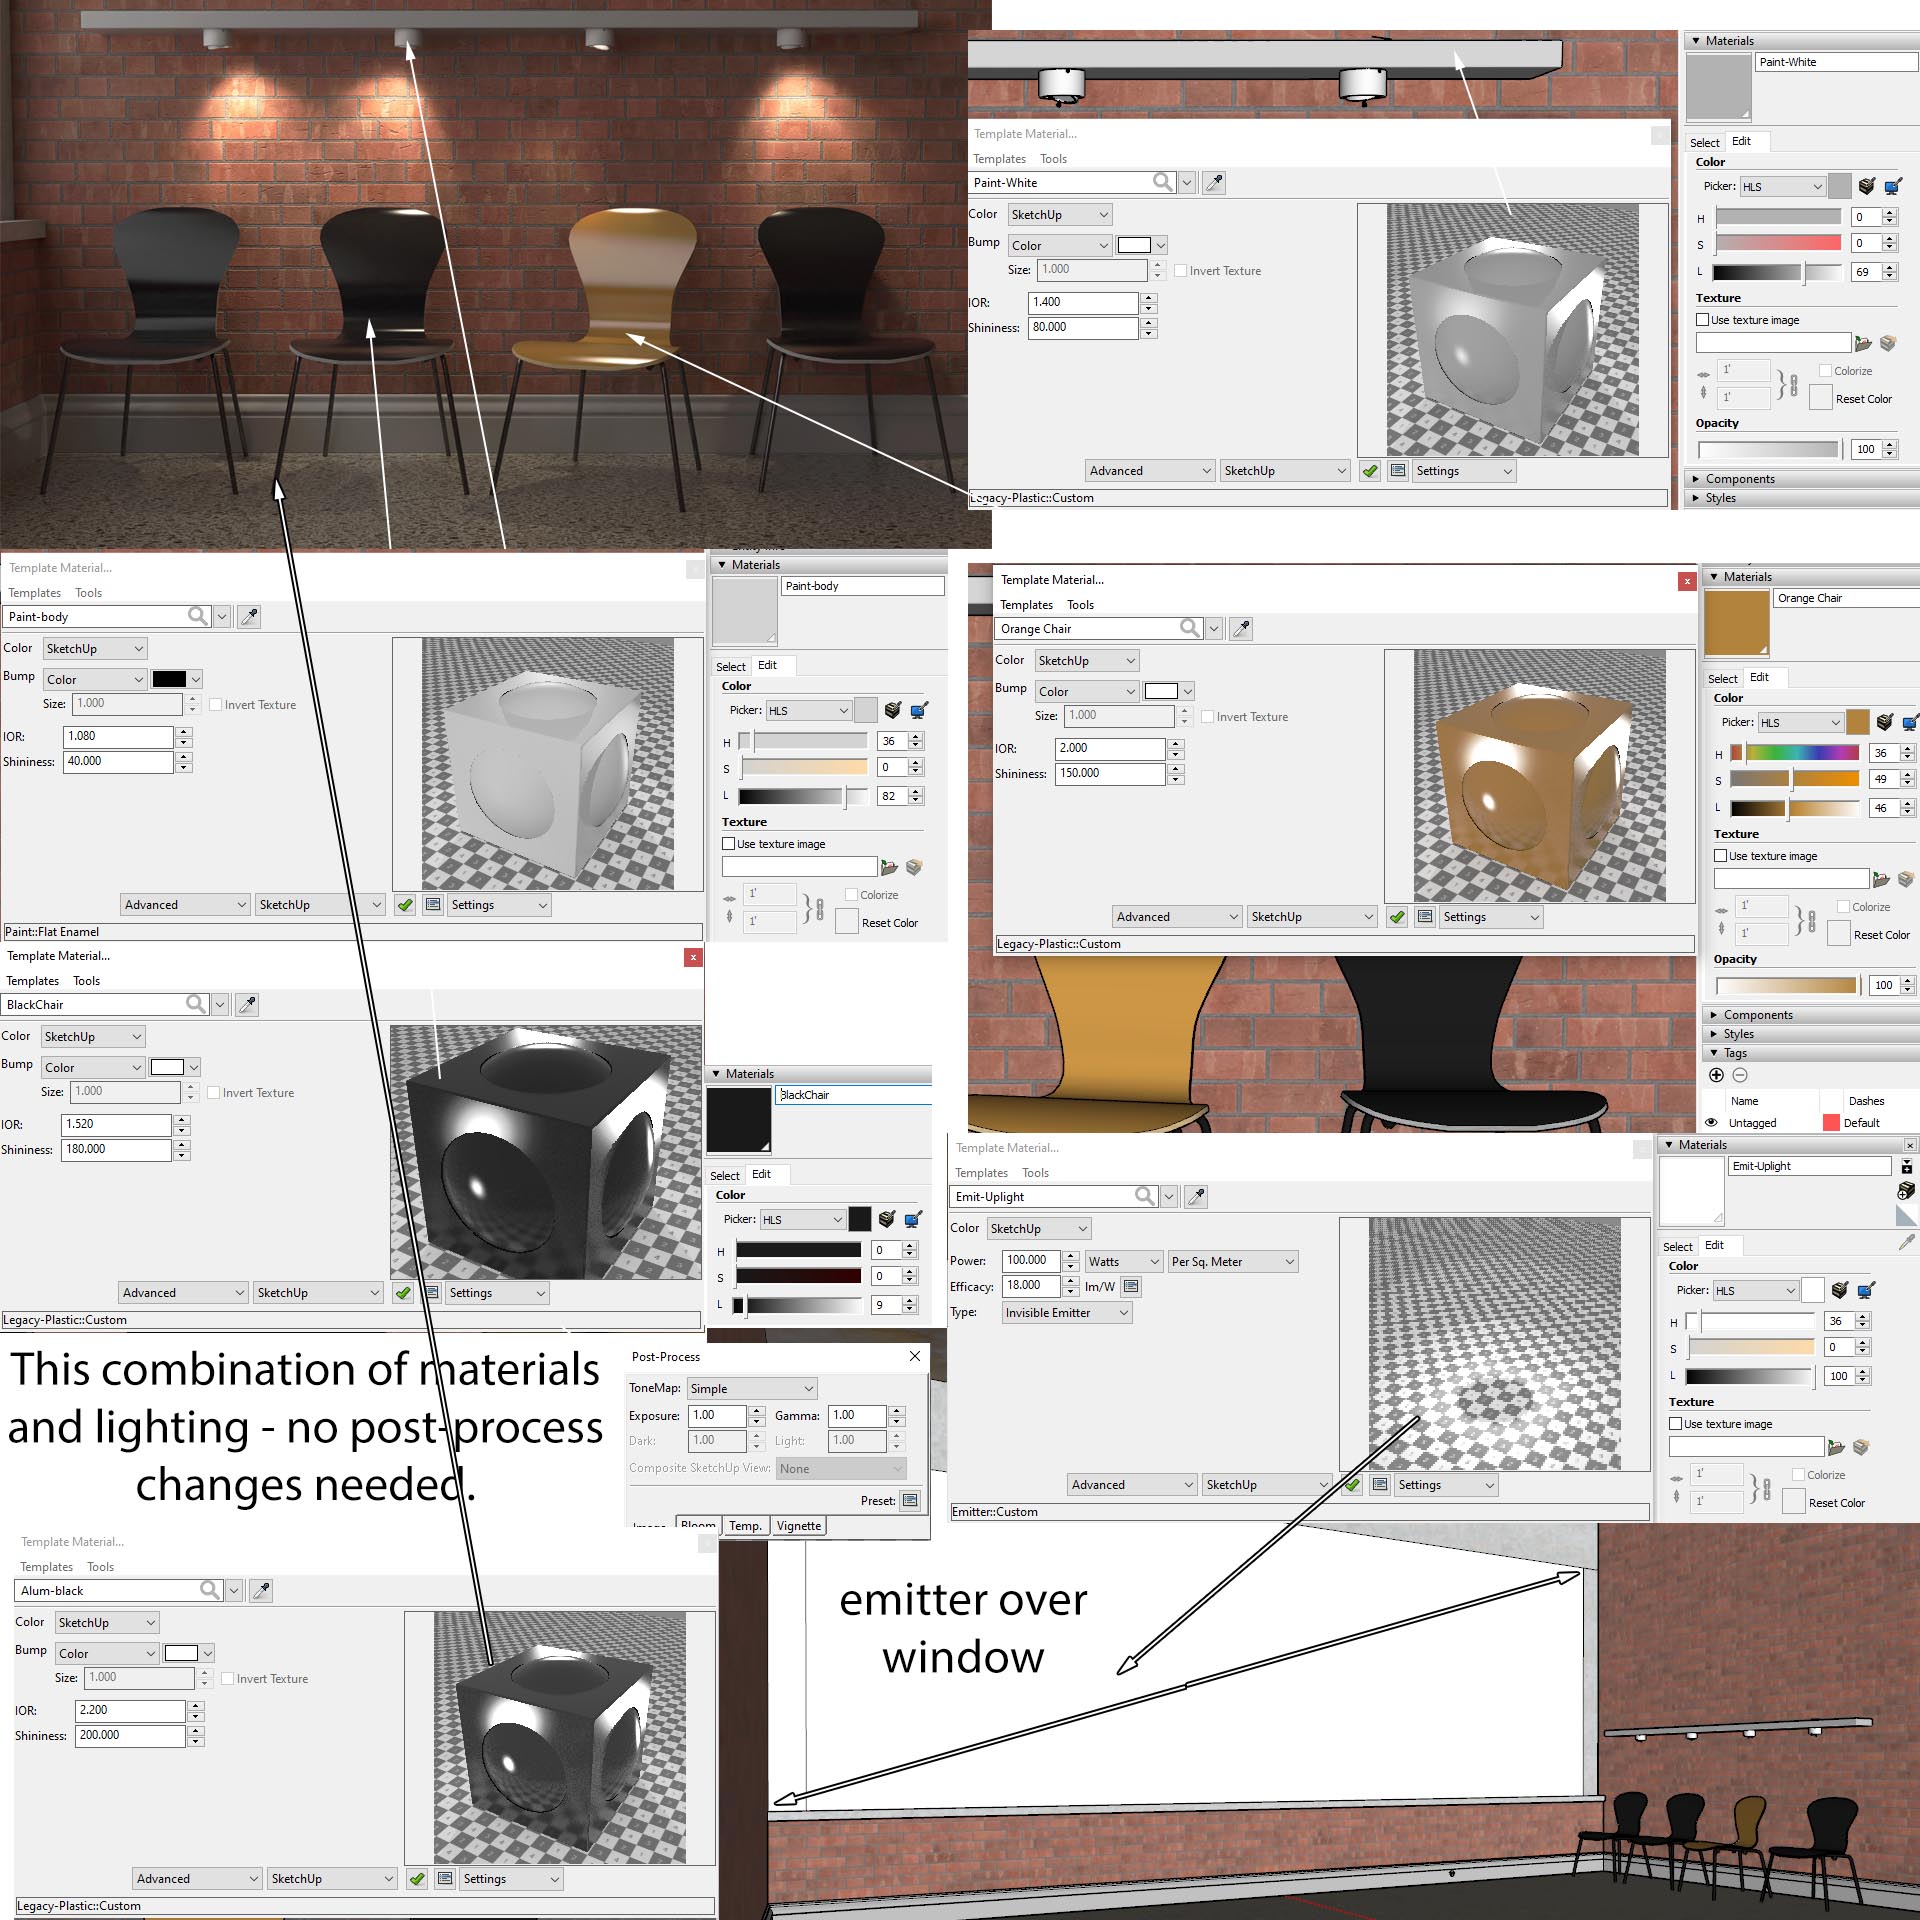
Subject: Puck Lights - free scene
Fletch wrote: ↑Mon Sep 14, 2020 9:43 pm
This scene is interesting because of the lighting, but also, the materials.
Here is some information on the materials.
Most importantly - White kept to 70% grey, Black at 9% black.
Re: Master Bedroom
Posted: Thu Sep 17, 2020 4:00 am
by recneps0610
Noted
all my render works now doesn't use real world values anymore, rather i lower the value then increase with exposure. I'll take note with the new tutorials and tips Fletch ;D

Fletch wrote: ↑Wed Sep 16, 2020 6:25 am
This is my most important tip lately, as it's surprisingly important and simple to do:
In the SketchUp material editor use the HLS type color editor, and slide that "L" - "lightness" slider down
the same amount for all your textures - slide it down approximately 30% so that
uniformly you make all your materials relatively darker. Most importantly all of your lighter materials (like the texture in your scene containing white, but also some other colors) but not only that - be sure to set all white surfaces like ceiling and walls in your scene to 70% grey.
Why?
This is closer to real-world physics and proper gamma space for your textures/colors/materials.
This means that the calculations for the light bounces will be more accurate, and so the error check that is built into the rendering algorithm will reject less of it's calculations and have to correct less, which means it will find a good result more quickly.
Be sure your light powers are set to real-world realistic values, if you find yourself increasing light powers more and more, then it could be that something is wrong. Instead, you should use the Post-Process tab in the Render Dialog (little button at bottom of dialog box) to adjust the brightness of the rendering. Try adjust the Light and Dark values found on the Linear tab inside of the Post-Process Dialog - it can give better results in many cases - especially with interior renderings when interior lights are shining directly on nearby light-colored surfaces.
After you feel you have gotten this set up right, you can then individually boost/decrease the relative "lightness" of each texture. You should be comparing the lightness of the rendered wood and the rendered white walls and other adjacent materials. It is a balance between the artist's eye and actual physics of light in this phase.
Subject: Puck Lights - free scene
Fletch wrote: ↑Mon Sep 14, 2020 9:43 pm
This scene is interesting because of the lighting, but also, the materials.
Here is some information on the materials.
Most importantly - White kept to 70% grey, Black at 9% black.
Re: Master Bedroom
Posted: Thu Sep 17, 2020 7:15 am
by Fletch
recneps0610 wrote: ↑Thu Sep 17, 2020 4:00 am
all my render works now doesn't use real world values anymore,

Fletch wrote:Be sure your light powers are set to real-world realistic values